

After purchasing a brand new HomePod speaker and preparing Apple Music playlists, users have another very important step to complete – to properly set up HomePod. According to Apple, the setup process is as simple and fast as possible and can take less than a minute.
It really is. You only need to know two important details, which we will discuss in the step-by-step instructions below.
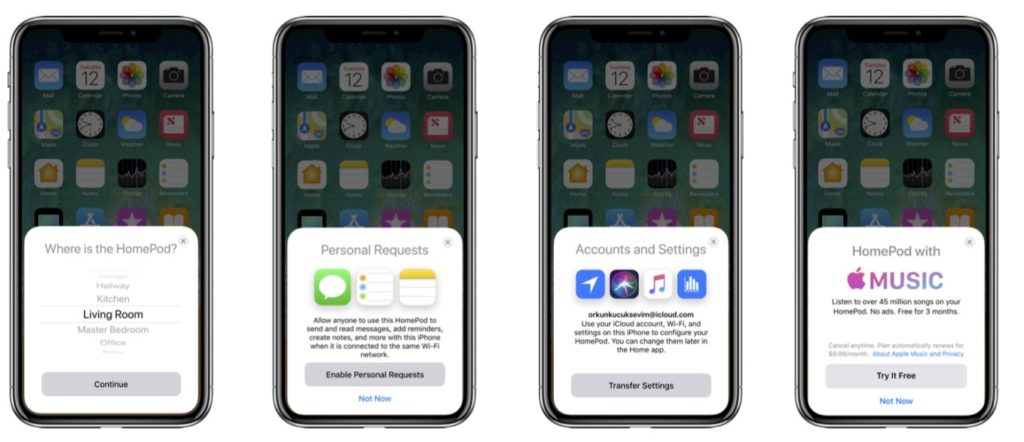
How to set up HomePod
Step 1 : First, you need to update your iPhone or iPad to iOS 11.2.5 (go to Settings -> General -> Software Updates ).
Step 2 : Connect the HomePod to a power source.
Step 3 : Bring your iPhone closer to the speaker after it turns on. A menu will pop up on the smartphone (as when connecting AirPods). Start customization.
Step 4 : If you have multiple modes configured in the Home app, you will be able to choose one for your HomePod (most will not have this step). Then you will need to select the room in which the HomePod is located (living room, kitchen, etc.).
Step 5 : Now we get to the important part. You will be prompted to enable the Personal Requests feature. It will allow you to read and reply to messages, add notes and set reminders using the column. The function works only when your iPhone is connected to the same network as the speaker.
If you do not live alone, then it is better not to enable the function. HomePod cannot distinguish voices, so anyone can walk up to the speaker and ask it to read your messages. On the current setup page, you can either enable the feature or click not now. In the future, you can change your choice.
Step 6 : Confirm the terms and conditions.
Step 7: Now click on the Transfer Settings button , and your iOS device will transfer all important information to the column, like iCloud account, Wi-Fi password, etc. After you press the button, the HomePod will beep. It is an audio-based authentication system similar to Apple Watch’s image-based authentication. Before starting the data transfer, you will need to enter your Apple ID password.
Step 8: If you don’t have an Apple Music subscription, you will be offered a 3 months free trial subscription.
Step 9: At the end of the setup, Siri on the HomePod will guide you through the speaker. The virtual assistant will ask you to repeat a few questions so that you understand how it works.
That’s all, the column is set up. You can say, “Hey Siri, play the music,” and HomePod will start playing. The process was really quick and easy. You can ask to include any song from the 45 million available. In addition, you can even listen to songs saved in iCloud.


